


KubeSphere, with its latest release of 3.2.0, provides a built-in authentication service based on OpenID Connect (OIDC) in addition to its support for AD/LDAP and OAuth 2.0 identity authentication systems. You can easily integrate your existing identify providers that support the OIDC standard.
This article uses Okta as an example to look into the process of how to integrate KubeSphere with an OIDC identity provider.
What is OpenID Connect?
OpenID Connect (OIDC) is an identity layer built on top of the OAuth 2.0 framework. As an open authentication protocol, OIDC allows clients to verify the identity of an end user and to obtain basic user profile information.
Curious about the major characteristics of OIDC?
- Use of identity tokens. OIDC extends the authentication capabilities of OAuth by using components such as an "ID token" issued as a JSON Web Token (JWT).
- Based on the OAuth 2.0 framework. The ID token is obtained through a standard OAuth 2.0 flow, which also means having one protocol for authentication and authorization.
- Simplicity. OIDC is simple enough to integrate with basic applications, but it also has the features and security options to match demanding enterprise requirements.
What is Okta?
Okta is a customizable, secure, and drop-in solution to add authentication and authorization services to your applications. It uses cloud software which helps organizations in managing and securing user authentications into applications.
Okta provides you with a variety of advantages. I'll just name a few here.
- Single Sign-On (SSO). Okta’s SSO solution can quickly connect to and sync from any number of identity stores including AD, LDAP, HR systems, and other third-party identity providers.
- Adaptive multifactor authentication. Okta secures accounts and applications with a strong multifactor authentication solution.
- Personalized user experience. Okta provides ease of use for end users to access applications.
Practice: Integrate KubeSphere with Okta
Preparations
As mentioned above, this article explains how to integrate KubeSphere with Okta. Therefore, you have to prepare a KubeSphere cluster in advance. You can take a look at this tutorial to quickly set up your own KubeSphere cluster.
(Optional) Step 1: Enable HTTPS for KubeSphere web console
For production environment, HTTPS is recommended as it provides better security. If you don't need HTTPS in your environment, you can skip this step.
- To enable HTTPS for your KubeSphere web console, you need to get a certificate from a Certificate Authority (CA). For example, you can apply a certificate from Let's Encrypt.
- cert-manager is a Kubernetes add-on to automate the management and issuance of TLS certificates from various issuing sources. To set up your cert-manager, you can take a look at this example. I won't go into details here.
In this article, let's use the URL https://console.kubesphere.io for accessing the KubeSphere web console.
(Optional) Step 2: Create an Okta account
If you already have an Okta account, you can skip this step, but you need to make sure your existing Okta account has the admin permission. If not, go to the Okta Workforce Identity Trial page to create an account.
Enter your information in the required fields and click Get Started.
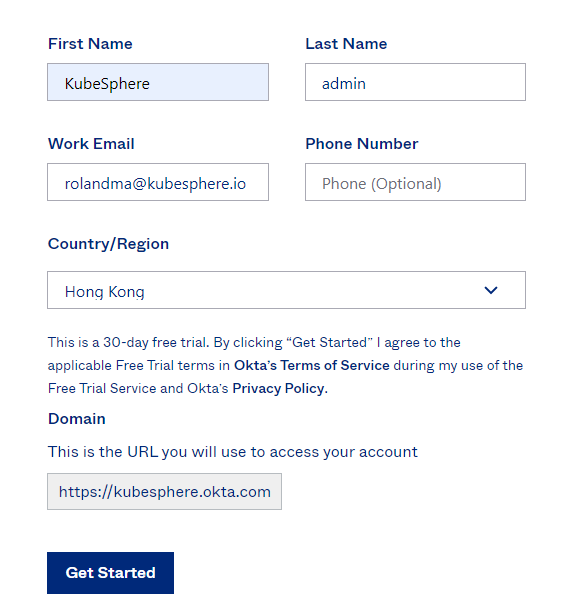
After you receive the activation email from Okta and activate your account, you can log in to Okta using the registered domain.
When you log in Okta for the first time, you will be asked to set up multifactor authentication. For more information, you can refer to Okta documentation.
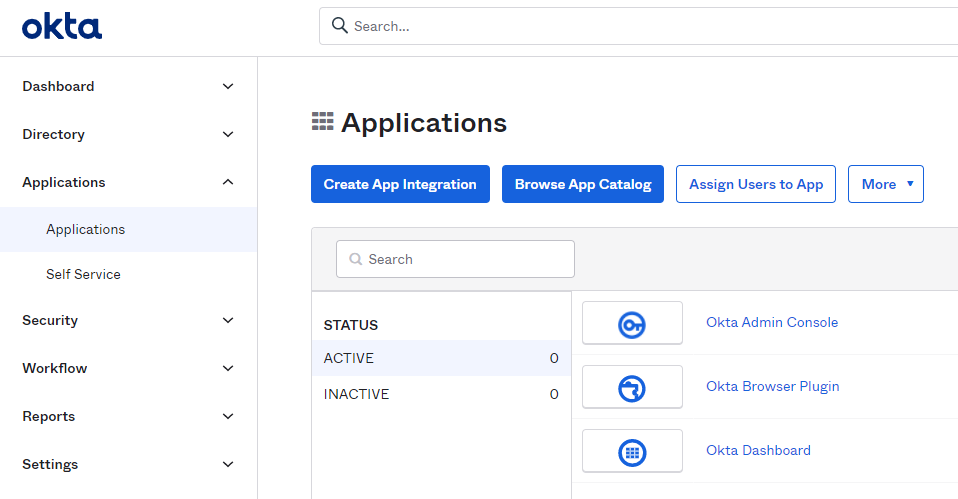
Step 3: Create an Okta application
On the Okta admin console, select Applications > Applications on the left navigation pane and click Create App Integration.
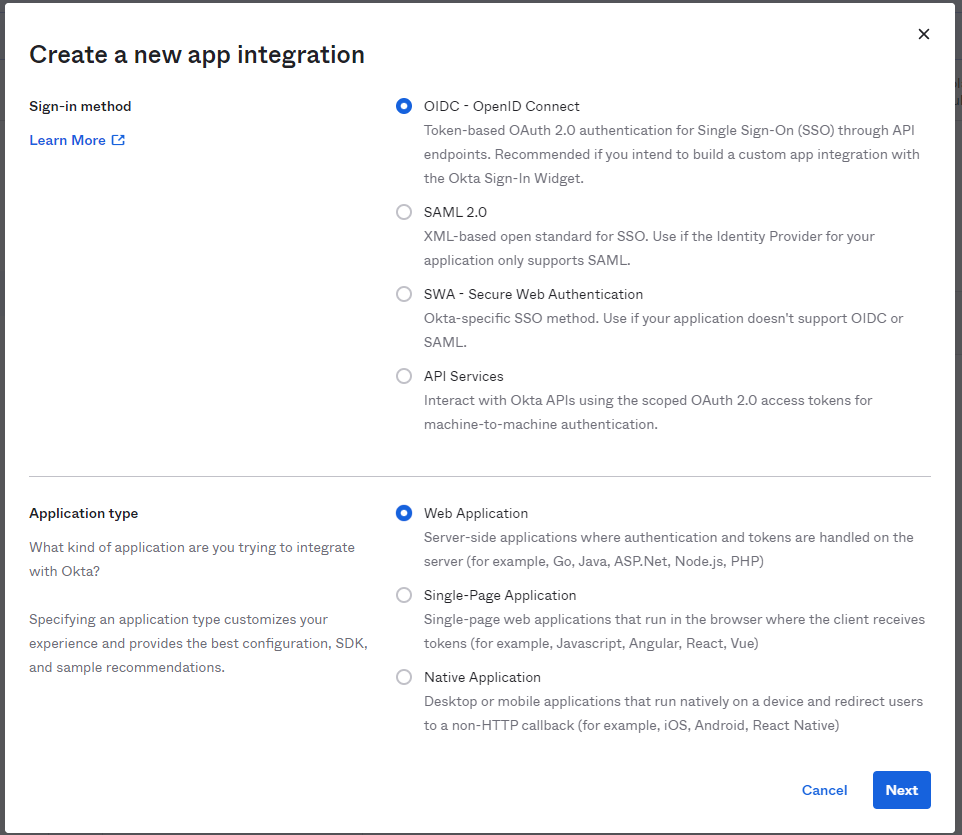
In the displayed dialog box, select OIDC - OpenID Connect, select Web Application, and click Next.
For General Settings, you need to configure the following settings:
App integration name. Specify a name for your application integration.
Logo (Optional). Add a logo for your application integration.
Grant type. Select Authorization Code and Refresh Token.
Sign-in redirect URIs. The sign-in redirect URI is where Okta sends the authentication response and ID token for a sign-in request. In this example, I won't use the wildcard
*in the sign-in redirect URI, which needs to be set in the format ofhttp(s)://<Domain or IP address:port>/oauth/redirect/<Provider name>.<Provider name>can be set based on your needs, but it has to be consistent with thenamespecified under theidentityProviderssection in the CRDClusterConfiguration.Sign-out redirect URIs (Optional). When KubeSphere contacts Okta to close a user session, Okta redirects the user to this URI.
(Optional) Controlled access. The default access option assigns and grants access to everyone in your Okta organization for this new app integration. Besides, you can choose to limit access to selected groups and use the field to enter the names of specific groups in your organization, or skip group assignment for now and create the app without assigning a group.

When you finish configuring your settings, click Save to commit your application.
On the Okta application page, you can click your application to go to its details page. On the General tab, you can see the Client ID and Client secret. We will need them later on when configuring the CRD
ClusterConfigurationon KubeSphere.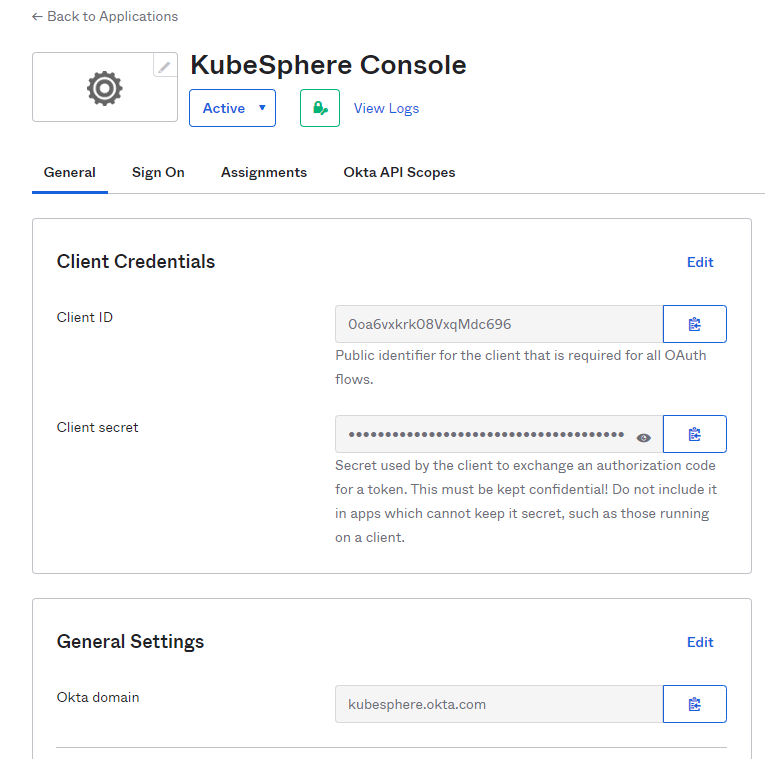
Step 4: Make configurations on KubeSphere
Log in to KubeSphere as
admin, move the cursor to in the lower-right corner, click kubectl, and run the following command to edit
 ks-installerof the CRDClusterConfiguration:kubectl -n kubesphere-system edit cc ks-installerAdd the following fields under
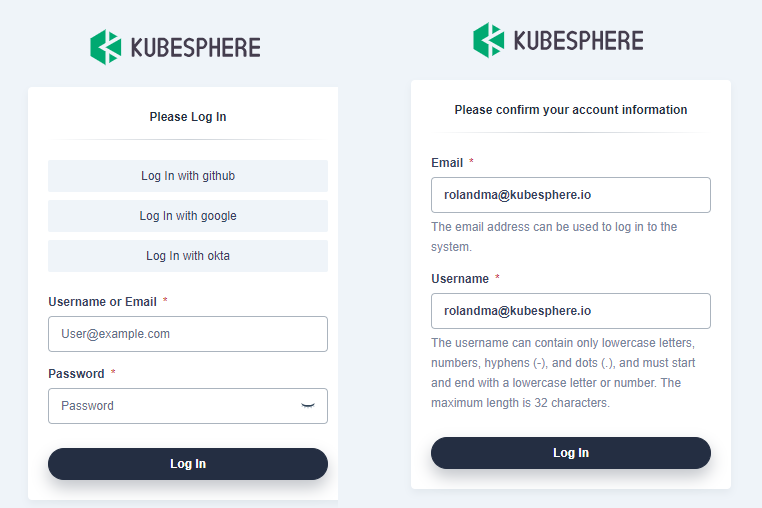
spec.authentication.jwtSecret.spec: authentication: jwtSecret: '' oauthOptions: identityProviders: - mappingMethod: auto name: Okta provider: clientID: **** # Get from Otka clientSecret: **** # Get from Otka issuer: https://kubesphere.Okta.com # Your Okta domain redirectURL: https://console.kubesphere.io/oauth/redirect/Okta scopes: - openid - email - profile type: OIDCIdentityProviderAfter the fields are configured, save your changes, and wait until the restart of ks-installer is complete. Okta login button is shown on the Login page of KubeSphere and you are redirected to Okta login page when clicking it. You will be required to register a valid username when log in to KubeSphere for the first time.
After you successfully log in to KubeSphere, you can assign roles for the users.
Recap
KubeSphere provides various ways to integrate with your existing identity providers. I believe OIDC is one of the easiest methods, which also enjoys support from many identity providers. Hope you can get a better understanding of how to integrate KubeSphere with Okta by following the steps in this article.
Last but not the least, enjoy exploring KubeSphere!
