


Set Up an HA Cluster Using the Internal HAProxy of KubeKey
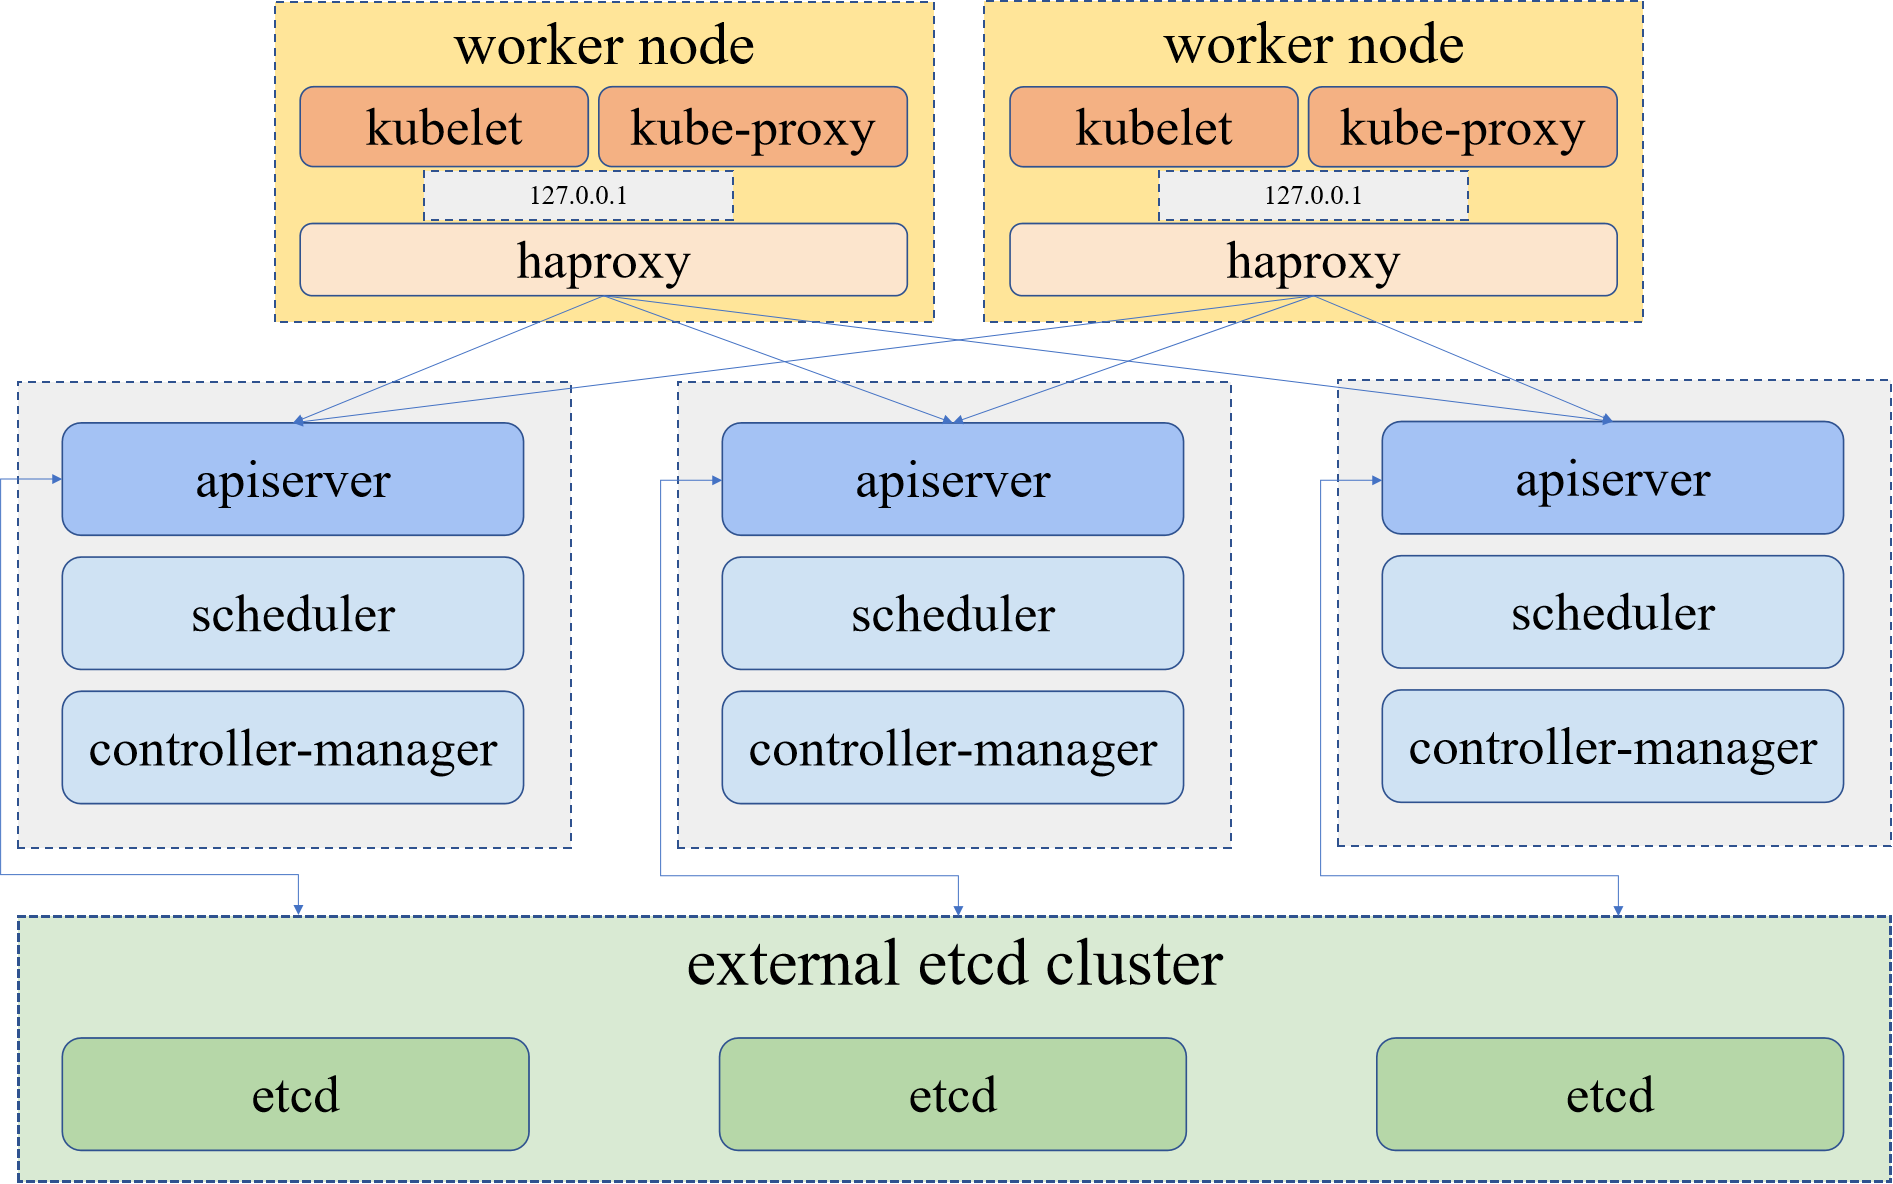
KubeKey is an easy-to-use tool for creating Kubernetes clusters. Starting from v1.2.1, KubeKey provides a built-in high availability mode to simplify the creation of highly available Kubernetes clusters. The high availability mode that KubeKey implements is called local load balancing mode. KubeKey deploys a load balancer (HAProxy) on each worker node, and the Kubernetes components on all control planes connect to their local kube-apiserver. The Kubernetes components on each worker node, on the other hand, connect to the kube-apiserver of multiple control planes through a reverse proxy, namely the load balancer deployed by KubeKey. Although this mode is less efficient than a dedicated load balancer because additional health check mechanisms are introduced, it brings a more practical, efficient, and convenient high availability deployment mode when current environment cannot provide an external load balancer or virtual IP (VIP).
This document describes how to use the built-in high availability mode when installing KubeSphere on Linux.
Architecture
The following figure shows the example architecture of the built-in high availability mode. For more information about system and network requirements, see Multi-node Installation.
Note
In the development environment, make sure you have prepared six Linux machines, among which three of them serve as control planes and the other three as worker nodes.
Download KubeKey
Refer to the following steps to download KubeKey.
Download KubeKey from its GitHub Release Page or run the following command.
curl -sfL https://get-kk.kubesphere.io | VERSION=v3.0.13 sh -
Run the following command first to make sure that you download KubeKey from the correct zone.
export KKZONE=cn
Run the following command to download KubeKey:
curl -sfL https://get-kk.kubesphere.io | VERSION=v3.0.13 sh -
Note
After you download KubeKey, if you transfer it to a new machine also with poor network connections to Googleapis, you must run
export KKZONE=cn again before you proceed with the following steps.Note
The preceding commands download the latest release of KubeKey (v3.0.7). You can modify the version number in the command to download a specific version.
Make kk executable:
chmod +x kk
Create an example configuration file with default configurations. Here Kubernetes v1.22.12 is used as an example.
./kk create config --with-kubesphere v3.4.1 --with-kubernetes v1.22.12
Note
- Recommended Kubernetes versions for KubeSphere 3.4: v1.20.x, v1.21.x, v1.22.x, v1.23.x, * v1.24.x, * v1.25.x, and * v1.26.x. For Kubernetes versions with an asterisk, some features of edge nodes may be unavailable due to incompatability. Therefore, if you want to use edge nodes, you are advised to install Kubernetes v1.23.x. If you do not specify a Kubernetes version, KubeKey will install Kubernetes v1.23.10 by default. For more information about supported Kubernetes versions, see Support Matrix.
- If you do not add the flag
--with-kubespherein the command in this step, KubeSphere will not be deployed unless you install it using theaddonsfield in the configuration file or add this flag again when you use./kk create clusterlater. - If you add the flag
--with-kubespherewithout specifying a KubeSphere version, the latest version of KubeSphere will be installed.
Deploy KubeSphere and Kubernetes
After you run the preceding commands, a configuration file config-sample.yaml is created. Edit the file to add machine information, configure the load balancer and more.
Note
The file name may be different if you customize it.
config-sample.yaml example
spec:
  hosts:
  - {name: master1, address: 192.168.0.2, internalAddress: 192.168.0.2, user: ubuntu, password: Testing123}
  - {name: master2, address: 192.168.0.3, internalAddress: 192.168.0.3, user: ubuntu, password: Testing123}
  - {name: master3, address: 192.168.0.4, internalAddress: 192.168.0.4, user: ubuntu, password: Testing123}
  - {name: node1, address: 192.168.0.5, internalAddress: 192.168.0.5, user: ubuntu, password: Testing123}
  - {name: node2, address: 192.168.0.6, internalAddress: 192.168.0.6, user: ubuntu, password: Testing123}
  - {name: node3, address: 192.168.0.7, internalAddress: 192.168.0.7, user: ubuntu, password: Testing123}
  roleGroups:
    etcd:
    - master1
    - master2
    - master3
    control-plane:
    - master1
    - master2
    - master3
    worker:
    - node1
    - node2
    - node3
For more information about different fields in this configuration file, see Kubernetes Cluster Configurations and Multi-node Installation.
Enable the built-in high availability mode
spec:
  controlPlaneEndpoint:
    ##Internal loadbalancer for apiservers
    #internalLoadbalancer: haproxy

    domain: lb.kubesphere.local
    address: ""
    port: 6443
Note
- To enable the built-in high availability mode, uncomment the field
internalLoadbalancer. - The fields
addressandportinconfig-sample.yamlmust be indented by two spaces againstcontrolPlaneEndpoint. - The default internal access domain name for the load balancer is
lb.kubesphere.local.
Persistent storage plugin configurations
For a production environment, you need to prepare persistent storage and configure the storage plugin (for example, CSI) in config-sample.yaml to define which storage service you want to use. For more information, see Persistent Storage Configurations.
(Optional) Enable pluggable components
KubeSphere has decoupled some core feature components since v2.1.0. These components are designed to be pluggable which means you can enable them either before or after installation. By default, KubeSphere is installed with the minimal package if you do not enable them.
You can enable any of them according to your demands. It is highly recommended that you install these pluggable components to discover the full-stack features and capabilities provided by KubeSphere. Make sure your machines have sufficient CPU and memory before enabling them. See Enable Pluggable Components for details.
Start installation
After you complete the configuration, run the following command to start installation:
./kk create cluster -f config-sample.yaml
Verify installation
Run the following command to inspect the logs of installation.
kubectl logs -n kubesphere-system $(kubectl get pod -n kubesphere-system -l 'app in (ks-install, ks-installer)' -o jsonpath='{.items[0].metadata.name}') -fWhen you see the following message, it means your HA cluster is successfully created.
#####################################################
###              Welcome to KubeSphere!           ###
#####################################################

Console: http://192.168.0.3:30880
Account: admin
Password: P@88w0rd

NOTES:
  1. After you log into the console, please check the
     monitoring status of service components in
     the "Cluster Management". If any service is not
     ready, please wait patiently until all components
     are up and running.
  2. Please change the default password after login.

#####################################################
https://kubesphere.io             2020-xx-xx xx:xx:xx
#####################################################
Feedback
Was this page Helpful?
Receive the latest news, articles and updates from KubeSphere
Thanks for the feedback. If you have a specific question about how to use KubeSphere, ask it on Slack. Open an issue in the GitHub repo if you want to report a problem or suggest an improvement.
 Previous

What’s on this Page