


Deploy KubeSphere on Azure VM Instances
Using the Azure cloud platform, you can either install and manage Kubernetes by yourself or adopt a managed Kubernetes solution. If you want to use a fully-managed platform solution, see Deploy KubeSphere on AKS for more details.
Alternatively, you can set up a highly-available cluster on Azure instances. This tutorial demonstrates how to create a production-ready Kubernetes and KubeSphere cluster.
Introduction
This tutorial uses two key features of Azure virtual machines (VMs):
- Virtual Machine Scale Sets (VMSS): Azure VMSS let you create and manage a group of load balanced VMs. The number of VM instances can automatically increase or decrease in response to demand or a defined schedule (Kubernetes Autoscaler is available, but not covered in this tutorial. See autoscaler for more details), which perfectly fits Worker nodes.
- Availability Sets: An availability set is a logical grouping of VMs within a datacenter that are automatically distributed across fault domains. This approach limits the impact of potential physical hardware failures, network outages, or power interruptions. All the Master and etcd VMs will be placed in an availability set to achieve high availability.
Besides these VMs, other resources like Load Balancer, Virtual Network and Network Security Group will also be used.
Prerequisites
- You need an Azure account to create all the resources.
- Basic knowledge of Azure Resource Manager (ARM) templates, which are files that define the infrastructure and configuration for your project.
- For a production environment, it is recommended that you prepare persistent storage and create a StorageClass in advance. For development and testing, you can use OpenEBS, which is installed by KubeKey by default, to provision LocalPV directly.
Architecture
Six machines of Ubuntu 18.04 will be deployed in an Azure Resource Group. Three of them are grouped into an availability set, serving as both the control plane and etcd nodes. The other three VMs will be defined as a VMSS where Worker nodes will be running.

These VMs will be attached to a load balancer. There are two predefined rules in the load balancer:
- Inbound NAT: The SSH port will be mapped for each machine so that you can easily manage VMs.
- Load Balancing: The http and https ports will be mapped to Node pools by default. Other ports can be added on demand.
| Service | Protocol | Rule | Backend Port | Frontend Port/Ports | Pools |
|---|---|---|---|---|---|
| ssh | TCP | Inbound NAT | 22 | 50200, 50201, 50202, 50100~50199 | Master, Node |
| apiserver | TCP | Load Balancing | 6443 | 6443 | Master |
| ks-console | TCP | Load Balancing | 30880 | 30880 | Master |
| http | TCP | Load Balancing | 80 | 80 | Node |
| https | TCP | Load Balancing | 443 | 443 | Node |
Create HA Cluster Infrastructrue
You don't have to create these resources one by one. According to the best practice of infrastructure as code on Azure, all resources in the architecture are already defined as ARM templates.
Prepare machines
Click the Deploy button below, and you will be redirected to Azure and asked to fill in deployment parameters.


On the page that appears, only few parameters need to be changed. Click Create new under Resource group and enter a name such as
KubeSphereVMRG.Enter Admin Username.
Copy your public SSH key for the field Admin Key. Alternatively, create a new one with
ssh-keygen.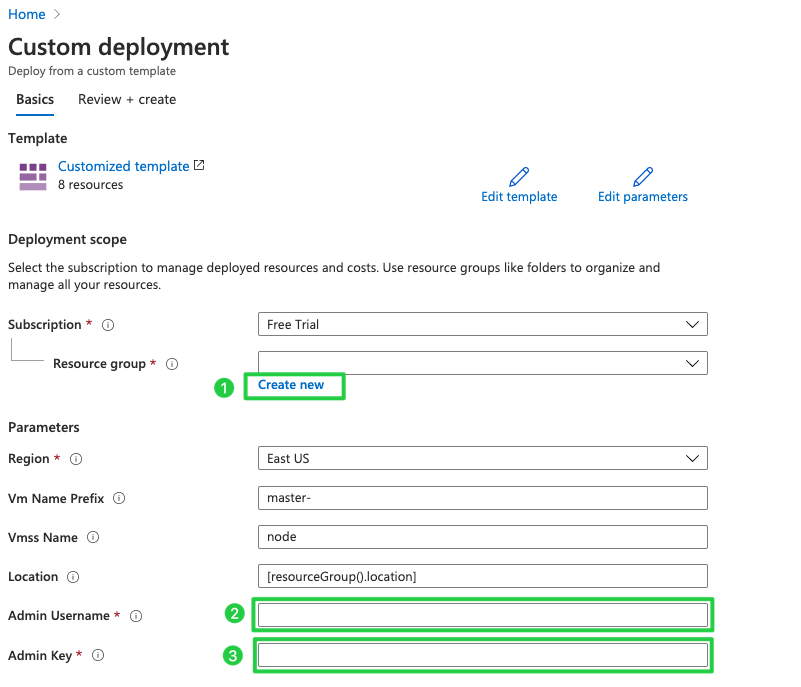
Note
Password authentication is restricted in Linux configurations. Only SSH is acceptable.Click Purchase at the bottom to continue.
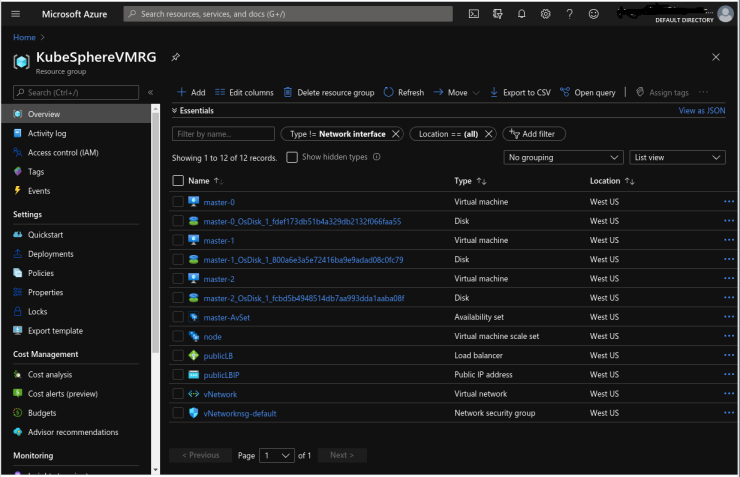
Review Azure resources in the Portal
After successfully created, all the resources will display in the resource group KubeSphereVMRG. Record the public IP of the load balancer and the private IP addresses of the VMs. You will need them later.
Deploy Kubernetes and KubeSphere
Execute the following commands on your device or connect to one of the Master VMs through SSH. During the installation, files will be downloaded and distributed to each VM.
# copy your private ssh to master-0
scp -P 50200  ~/.ssh/id_rsa kubesphere@40.81.5.xx:/home/kubesphere/.ssh/

# ssh to the master-0
ssh -i .ssh/id_rsa2  -p50200 kubesphere@40.81.5.xx
Download KubeKey
Kubekey is a brand-new installation tool which provides an easy, fast and flexible way to install Kubernetes and KubeSphere.
Download it so that you can generate a configuration file in the next step.
Download KubeKey from its GitHub Release Page or use the following command directly:
curl -sfL https://get-kk.kubesphere.io | VERSION=v3.0.13 sh -Run the following command first to make sure you download KubeKey from the correct zone.
export KKZONE=cnRun the following command to download KubeKey:
curl -sfL https://get-kk.kubesphere.io | VERSION=v3.0.13 sh -Note
After you download KubeKey, if you transfer it to a new machine also with poor network connections to Googleapis, you must runexport KKZONE=cnagain before you proceed with the steps below.Note
The commands above download the latest release of KubeKey. You can change the version number in the command to download a specific version.Make
kkexecutable:chmod +x kkCreate an example configuration file with default configurations. Here Kubernetes v1.22.12 is used as an example.
./kk create config --with-kubesphere v3.4.1 --with-kubernetes v1.22.12Note
Recommended Kubernetes versions for KubeSphere 3.4: v1.20.x, v1.21.x, v1.22.x, v1.23.x, * v1.24.x, * v1.25.x, and * v1.26.x. For Kubernetes versions with an asterisk, some features of edge nodes may be unavailable due to incompatability. Therefore, if you want to use edge nodes, you are advised to install Kubernetes v1.23.x. If you do not specify a Kubernetes version, KubeKey will install Kubernetes v1.23.10 by default. For more information about supported Kubernetes versions, see Support Matrix.
If you do not add the flag
--with-kubespherein the command in this step, KubeSphere will not be deployed unless you install it using theaddonsfield in the configuration file or add this flag again when you use./kk create clusterlater.If you add the flag
--with-kubespherewithout specifying a KubeSphere version, the latest version of KubeSphere will be installed.
Example configurations
spec:
  hosts:
  - {name: master-0, address: 40.81.5.xx, port: 50200, internalAddress: 10.0.1.4, user: kubesphere, privateKeyPath: "~/.ssh/id_rsa"}
  - {name: master-1, address: 40.81.5.xx, port: 50201, internalAddress: 10.0.1.5, user: kubesphere, privateKeyPath: "~/.ssh/id_rsa"}
  - {name: master-2, address: 40.81.5.xx, port: 50202, internalAddress: 10.0.1.6, user: kubesphere, privateKeyPath: "~/.ssh/id_rsa"}
  - {name: node000000, address: 40.81.5.xx, port: 50100, internalAddress: 10.0.0.4, user: kubesphere, privateKeyPath: "~/.ssh/id_rsa"}
  - {name: node000001, address: 40.81.5.xx, port: 50101, internalAddress: 10.0.0.5, user: kubesphere, privateKeyPath: "~/.ssh/id_rsa"}
  - {name: node000002, address: 40.81.5.xx, port: 50102, internalAddress: 10.0.0.6, user: kubesphere, privateKeyPath: "~/.ssh/id_rsa"}
  roleGroups:
    etcd:
    - master-0
    - master-1
    - master-2
    control-plane:
    - master-0
    - master-1
    - master-2
    worker:
    - node000000
    - node000001
    - node000002
For more information, see this file.
Configure the load balancer
In addition to node information, you need to configure your load balancer in the same YAML file. For the IP address, you can find it in Azure > KubeSphereVMRG > PublicLB. Assume the IP address and listening port of the load balancer are 40.81.5.xx and 6443 respectively, and you can refer to the following example.
## Public LB config example
## apiserver_loadbalancer_domain_name: "lb.kubesphere.local"
  controlPlaneEndpoint:
    domain: lb.kubesphere.local
    address: "40.81.5.xx"
    port: 6443
Note
The public load balancer is used directly instead of an internal load balancer due to Azure Load Balancer limits.
Persistent storage plugin configurations
See Persistent Storage Configurations for details.
Configure the network plugin
Azure Virtual Network doesn't support the IPIP mode used by Calico. You need to change the network plugin to flannel.
  network:
    plugin: flannel
    kubePodsCIDR: 10.233.64.0/18
    kubeServiceCIDR: 10.233.0.0/18
Create a cluster
After you complete the configuration, you can execute the following command to start the installation:
./kk create cluster -f config-sample.yamlInspect the logs of installation:
kubectl logs -n kubesphere-system $(kubectl get pod -n kubesphere-system -l 'app in (ks-install, ks-installer)' -o jsonpath='{.items[0].metadata.name}') -fWhen the installation finishes, you can see the following message:
#####################################################
###              Welcome to KubeSphere!           ###
#####################################################
Console: http://10.128.0.44:30880
Account: admin
Password: P@88w0rd
NOTES:
  1. After you log into the console, please check the
     monitoring status of service components in
     the "Cluster Management". If any service is not
     ready, please wait patiently until all components
     are up and running.
  2. Please change the default password after login.
#####################################################
https://kubesphere.io             2020-xx-xx xx:xx:xx
Access the KubeSphere console using
<NodeIP>:30880with the default account and password (admin/P@88w0rd).
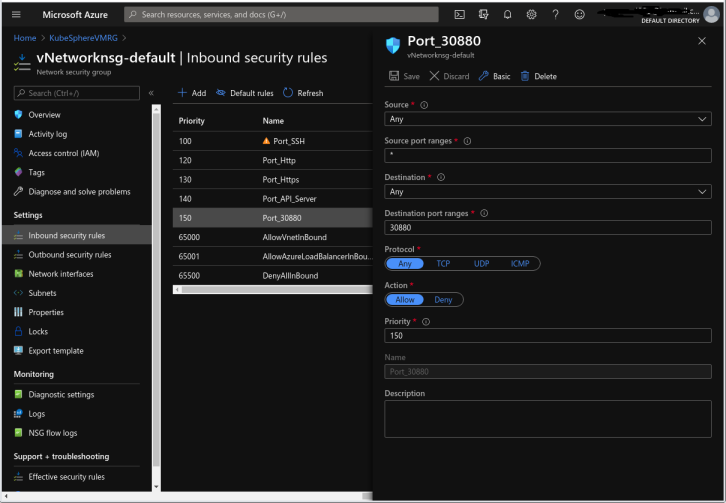
Add Additional Ports
As the Kubernetes cluster is set up on Azure instances directly, the load balancer is not integrated with Kubernetes Services. However, you can still manually map the NodePort to the load balancer. There are 2 steps required.
- Create a new Load Balance Rule in the load balancer.
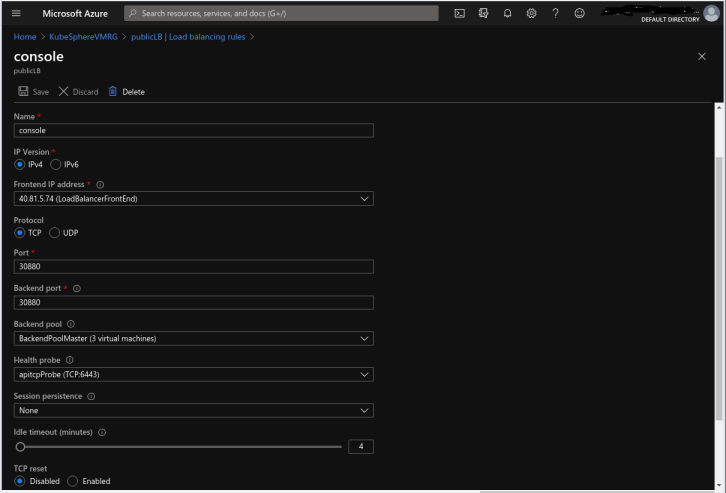
- Create an Inbound Security rule to allow Internet access in the Network Security Group.
Feedback
Was this page Helpful?
Receive the latest news, articles and updates from KubeSphere
Thanks for the feedback. If you have a specific question about how to use KubeSphere, ask it on Slack. Open an issue in the GitHub repo if you want to report a problem or suggest an improvement.
 Previous

What’s on this Page