


Create a Multi-cluster Pipeline
As cloud providers offer different hosted Kubernetes services, DevOps pipelines have to deal with use cases where multiple Kubernetes clusters are involved.
This tutorial demonstrates how to create a multi-cluster pipeline on KubeSphere.
Prerequisites
- You need to have three Kubernetes clusters with KubeSphere installed. Choose one cluster as your host cluster and the other two as your member clusters. For more information about cluster roles and how to build a multi-cluster environment on KubeSphere, refer to Multi-cluster Management.
- You need to set your member clusters as public clusters. Alternatively, you can set cluster visibility after a workspace is created.
- You need to enable the KubeSphere DevOps system on your host cluster.
- You need to integrate SonarQube into your pipeline. For more information, refer to Integrate SonarQube into Pipelines.
- You need to create four accounts on your host cluster:
ws-manager,ws-admin,project-admin, andproject-regular, and grant these accounts different roles. For more information, refer to Create Workspaces, Projects, Users and Roles.
Workflow Overview
This tutorial uses three clusters to serve as three isolated environments in the workflow. See the diagram as below.
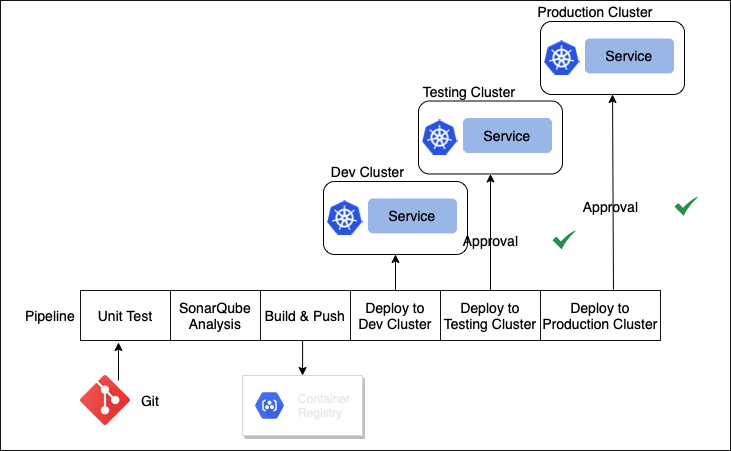
The three clusters are used for development, testing, and production respectively. Once codes get submitted to a Git repository, a pipeline will be triggered to run through the following stages—Unit Test, SonarQube Analysis, Build & Push, and Deploy to Development Cluster. Developers use the development cluster for self-testing and validation. When developers give approval, the pipeline will proceed to the stage of Deploy to Testing Cluster for stricter validation. Finally, the pipeline, with necessary approval ready, will reach the stage of Deploy to Production Cluster to provide services externally.
Hands-on Lab
Step 1: Prepare clusters
See the table below for the role of each cluster.
| Cluster Name | Cluster Role | Usage |
|---|---|---|
| host | Host cluster | Testing |
| shire | Member cluster | Production |
| rohan | Member cluster | Development |
Note
These Kubernetes clusters can be hosted across different cloud providers and their Kubernetes versions can also vary. Recommended Kubernetes versions for KubeSphere 3.3: v1.20.x, v1.21.x, * v1.22.x, * v1.23.x, and * v1.24.x. For Kubernetes versions with an asterisk, some features of edge nodes may be unavailable due to incompatability. Therefore, if you want to use edge nodes, you are advised to install Kubernetes v1.21.x.
Step 2: Create a workspace
Log in to the web console of the host cluster as
ws-manager. On the Workspaces page, click Create.On the Basic Information page, name the workspace
devops-multicluster, selectws-adminfor Administrator, and click Next.On the Cluster Settings page, select all three clusters and click Create.
The workspace created is displayed in the list. You need to log out of the console and log back in as
ws-adminto invite bothproject-adminandproject-regularto the workspace and grant them the roleworkspace-self-provisionerandworkspace-viewerrespectively. For more information, refer to Create Workspaces, Projects, Users and Roles.
Step 3: Create a DevOps project
Log out of the console and log back in as
project-admin. Go to the DevOps Projects page and click Create.In the displayed dialog box, enter
multicluster-demofor Name, select host for Cluster Settings, and then click OK.Note
Only clusters with the DevOps component enabled will be available in the drop-down list.The DevOps project created is displayed in the list. Make sure you invite the
project-regularuser to this project and assign it theoperatorrole. For more information, refer to Create Workspaces, Projects, Users and Roles.
Step 4: Create projects on clusters
You must create the projects as shown in the table below in advance. Make sure you invite the project-regular user to these projects and assign it the operator role. For more information about how to create a project, refer to Create Workspaces, Projects, Users and Roles.
| Cluster Name | Usage | Project Name |
|---|---|---|
| host | Testing | kubesphere-sample-prod |
| shire | Production | kubesphere-sample-prod |
| rohan | Development | kubesphere-sample-dev |
Step 5: Create credentials
Log out of the console and log back in as
project-regular. On the DevOps Projects page, click the DevOps projectmulticluster-demo.On the Credentials page, you need to create the credentials as shown in the table below. For more information about how to create credentials, refer to Credential Management and Create a Pipeline Using a Jenkinsfile.
Credential ID Type Where to Use host kubeconfig The host cluster for testing shire kubeconfig The member cluster for production rohan kubeconfig The member cluster for development dockerhub-id Username and password Docker Hub sonar-token Access token SonarQube Note
You have to manually enter the kubeconfig of your member clusters when creating the kubeconfig credentialsshireandrohan. Make sure your host cluster can access the API Server addresses of your member clusters.Five credentials are created in total.
Step 6: Create a pipeline
Go to the Pipelines page and click Create. In the displayed dialog box, enter
build-and-deploy-applicationfor Name and click Next.On the Advanced Settings tab, click Create to use the default settings.
The pipeline created is displayed in the list. Click its name to go to the details page.
Click Edit Jenkinsfile and copy and paste the following contents. Make sure you replace the value of
DOCKERHUB_NAMESPACEwith your own value, and then click OK.pipeline { agent { node { label 'maven' } } parameters { string(name:'BRANCH_NAME',defaultValue: 'master',description:'') } environment { DOCKER_CREDENTIAL_ID = 'dockerhub-id' PROD_KUBECONFIG_CREDENTIAL_ID = 'shire' TEST_KUBECONFIG_CREDENTIAL_ID = 'host' DEV_KUBECONFIG_CREDENTIAL_ID = 'rohan' REGISTRY = 'docker.io' DOCKERHUB_NAMESPACE = 'your Docker Hub account ID' APP_NAME = 'devops-maven-sample' SONAR_CREDENTIAL_ID = 'sonar-token' TAG_NAME = "SNAPSHOT-$BRANCH_NAME-$BUILD_NUMBER" } stages { stage('checkout') { steps { container('maven') { git branch: 'master', url: 'https://github.com/kubesphere/devops-maven-sample.git' } } } stage('unit test') { steps { container('maven') { sh 'mvn clean test' } } } stage('sonarqube analysis') { steps { container('maven') { withCredentials([string(credentialsId: "$SONAR_CREDENTIAL_ID", variable: 'SONAR_TOKEN')]) { withSonarQubeEnv('sonar') { sh "mvn sonar:sonar -Dsonar.login=$SONAR_TOKEN" } } } } } stage('build & push') { steps { container('maven') { sh 'mvn -Dmaven.test.skip=true clean package' sh 'docker build -f Dockerfile-online -t $REGISTRY/$DOCKERHUB_NAMESPACE/$APP_NAME:SNAPSHOT-$BRANCH_NAME-$BUILD_NUMBER .' withCredentials([usernamePassword(passwordVariable : 'DOCKER_PASSWORD' ,usernameVariable : 'DOCKER_USERNAME' ,credentialsId : "$DOCKER_CREDENTIAL_ID" ,)]) { sh 'echo "$DOCKER_PASSWORD" | docker login $REGISTRY -u "$DOCKER_USERNAME" --password-stdin' sh 'docker push $REGISTRY/$DOCKERHUB_NAMESPACE/$APP_NAME:SNAPSHOT-$BRANCH_NAME-$BUILD_NUMBER' } } } } stage('push latest') { steps { container('maven') { sh 'docker tag $REGISTRY/$DOCKERHUB_NAMESPACE/$APP_NAME:SNAPSHOT-$BRANCH_NAME-$BUILD_NUMBER $REGISTRY/$DOCKERHUB_NAMESPACE/$APP_NAME:latest ' sh 'docker push $REGISTRY/$DOCKERHUB_NAMESPACE/$APP_NAME:latest ' } } } stage('deploy to dev') { steps { container('maven') { withCredentials([ kubeconfigFile( credentialsId: env.DEV_KUBECONFIG_CREDENTIAL_ID, variable: 'KUBECONFIG') ]) { sh 'envsubst < deploy/dev-all-in-one/devops-sample.yaml | kubectl apply -f -' } } } } stage('deploy to staging') { steps { container('maven') { input(id: 'deploy-to-staging', message: 'deploy to staging?') withCredentials([ kubeconfigFile( credentialsId: env.TEST_KUBECONFIG_CREDENTIAL_ID, variable: 'KUBECONFIG') ]) { sh 'envsubst < deploy/prod-all-in-one/devops-sample.yaml | kubectl apply -f -' } } } } stage('deploy to production') { steps { container('maven') { input(id: 'deploy-to-production', message: 'deploy to production?') withCredentials([ kubeconfigFile( credentialsId: env.PROD_KUBECONFIG_CREDENTIAL_ID, variable: 'KUBECONFIG') ]) { sh 'envsubst < deploy/prod-all-in-one/devops-sample.yaml | kubectl apply -f -' } } } } } }Note
The flag-oin themvncommands indicates that the offline mode is enabled. If you have relevant maven dependencies and caches ready locally, you can keep the offline mode on to save time.After the pipeline is created, you can view its stages and steps on the graphical editing panel as well.
Step 7: Run the pipeline and check the results
Click Run to run the pipeline. The pipeline will pause when it reaches the stage deploy to staging as resources have been deployed to the cluster for development. You need to manually click Proceed twice to deploy resources to the testing cluster
hostand the production clustershire.After a while, you can see the pipeline status shown as Successful.
Check the pipeline running logs by clicking View Logs in the upper-right corner. For each stage, you click it to inspect logs, which can be downloaded to your local machine for further analysis.
Once the pipeline runs successfully, click Code Check to check the results through SonarQube.
Go to the Projects page, and you can view the resources deployed in different projects across the clusters by selecting a specific cluster from the drop-down list.
Feedback
Was this page Helpful?
Receive the latest news, articles and updates from KubeSphere
Thanks for the feedback. If you have a specific question about how to use KubeSphere, ask it on Slack. Open an issue in the GitHub repo if you want to report a problem or suggest an improvement.
 Previous

What’s on this Page